Contact
Do you need help?
Do you need help?
We have made it super easy for you to quickly and safely buy a party tent or promotool online.
Click on an article of your choice on the green button 'Add to cart’ or immediately click on ‘Buy it now’.
You can also add extra items to the shopping basket, change the number per item or remove items.
When your shopping basket is complete, click on ‘Checkout'.
Fill in your account details. We ask you to create your own account with login and password. This way you can easily follow up your order later on.
In this form you must also enter an invoicing address and, if different, a delivery address.
Shipping method: we ship your product straight to your home or office address.
Payment method: we offer you several secure payment methods
1. In advance by bank transfer
2. Via VISA or MasterCard
3. Via PayPal
When paying by bank transfer, we can only process your order after receipt of payment on our account.
All other payments are made immediately in the secure Shopify payment environment.
For this you need a card reader from your bank and your bank or credit card.
Your order will soon be confirmed by email.
Order by mail:
info@partyspace.es
We deliver all our products to your home or office address. Once your order is leaving our warehouse, we send you an email with a track and trace number where you can follow your shipment.
Because of our large stock of tents and accessories, we can deliver most products within 7 - 10 working days.
For printed products and non-standard colors, you should count on a delivery time of about 15-20working days.
Attention! Partyspace pays a lot of attention to the correctness and completeness of the information on this website. The available stock is subject to continuous change and the indication of the availability is only an indication.
We can not be held liable for mistakes.
If you need your order very soon, do not hesitate to contact us on info@partyspace.es.
As such, we can check the stock immediately.
You can request a quote by phone, using the contact form, using the chat or by e-mail. Our contact details can be found here.
Once you ordered a printed/customised item, our customer service team will contact you by email or phone.
File types that are almost always good are .ai and .eps files. If you don't know what we are talking about, then contact the person who designed your logo. He or she will definitely be able to help you. Pictures must be of very good quality in order to assure good printing results (preferably pictures made with a professional camera).
Send your logo or pictures to your Partyspace contact person or to info@partyspace.es if you ordered via our webshop. Please indicate how you would like the design.
Our graphic designer will make a design based on the logo and pictures you provided us with. You will receive the design by email. When we receive your approval by email, the design is sent to production. Production time takes about 3 weeks.
Before starting production, we send you the design by e-mail as a pdf file (if Partyspace made the design for you). Only after your approval by email, we start the production process.
Also if you made the design yourself in the correct Partyspace design template, our graphic designer will check the design and adapt it when necessary. If the design is production-ready, it is sent to production. Production time takes about 3 weeks.
Our products are first printed and afterwards made to side wall, beach flag, banner, roof ... It is thus not possible to print a non-printed product at a later time.
Tents
With single sided printing, a side wall is printed on one side with your logo, a phrase, a text, a picture ... The non-printed part is always white or black (as you wish). You can choose to print the side wall on the inside (with the print visible from inside the tent) or the outside (with the print visible from outside the tent).
If you want the non-printed part in another colour (one of our standard colours or yet another colour), that is seen as printing, which implies double sided printing costs will be charged instead of standard single sided printing costs.
With double sided printing, two single sided printed side walls are sewn together with a black layer in between, which makes sure the printing of one side doesn't show through the other side of the side wall.
Flags
With single sided printed flags, the message is visible mirror wise at the back side of the flag. Single sided printed flags are more resistant for outside use than double sided printed flags.
With double sided printed flags, two single sided printed parts are sewn together with a blackout layer in between, which assures the message is equally visible on both sides of the flag. We recommend using double sided printed flags online inside, since double sided flags wear out easier because of rubbing of the different parts.
The roof
The roof of a party tent is made out of PE, polyester or PVD. But what is the exact difference between these materials?
1. Polyethylen or PE is a fabric that mostly is used to produce less expensive tents, since the price of this fabric is clearly less. Nevertheless, PE fabrics are of inferior quality and have a very short life span. That is why Partyspace chooses not to offer tents made of PE.
2. Polyester with a PVC coating looks like woven cloth that is made waterproof by means of a plastic layer.
3.PVC is a woven cloth that has a coating on both sides and looks smooth. The advantages are the long life span and cleaning comfort.
4. Furthermore, you can always check the weight per square meter. The heavier the material, the stronger the cloth. Our folding tents, for example, are available in polyester of 320 g/m² or PVC light of 450 g/m².
5. All of our fabrics are water-repellent, UV resistant and fire-resistant.
6. Thermally welded seams are always a lot stronger than stitched ones.
The side walls
The side walls are mostly made of the same material as the roof: PE, polyester or PVC light
Side walls can be installed either by using velcro or by using zippers or elastic lashes.
2. Our side walls are installed around the tent legs from the bottom to the top as well as over the full length of the side walls. This assures a completely water- and windproof tent.
3. It is recommended for 6 and 8 m long side walls for our folding tents to split them into two parts, which offers more possible configurations of windows, doors and closed side walls and is also more convenient in terms of transport and installment.
4. Our side walls have extra lashes to fix the side walls to the ground to prevent them from being blown upwards and letting wind into the tent
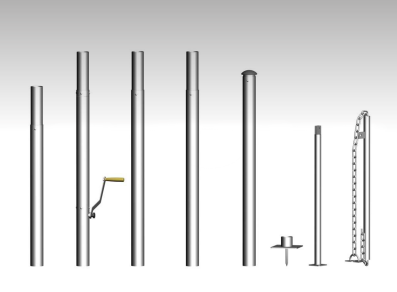
The frame of the party tent
1. The diameter and the wall thickness of the frame determine the strength of the tent.
2. Anodized aluminum is light, strong and rust-free.
3. If you choose a steel frame, then make sure the steel frame is galvanized. Coated steel will rust if the coating gets damaged.
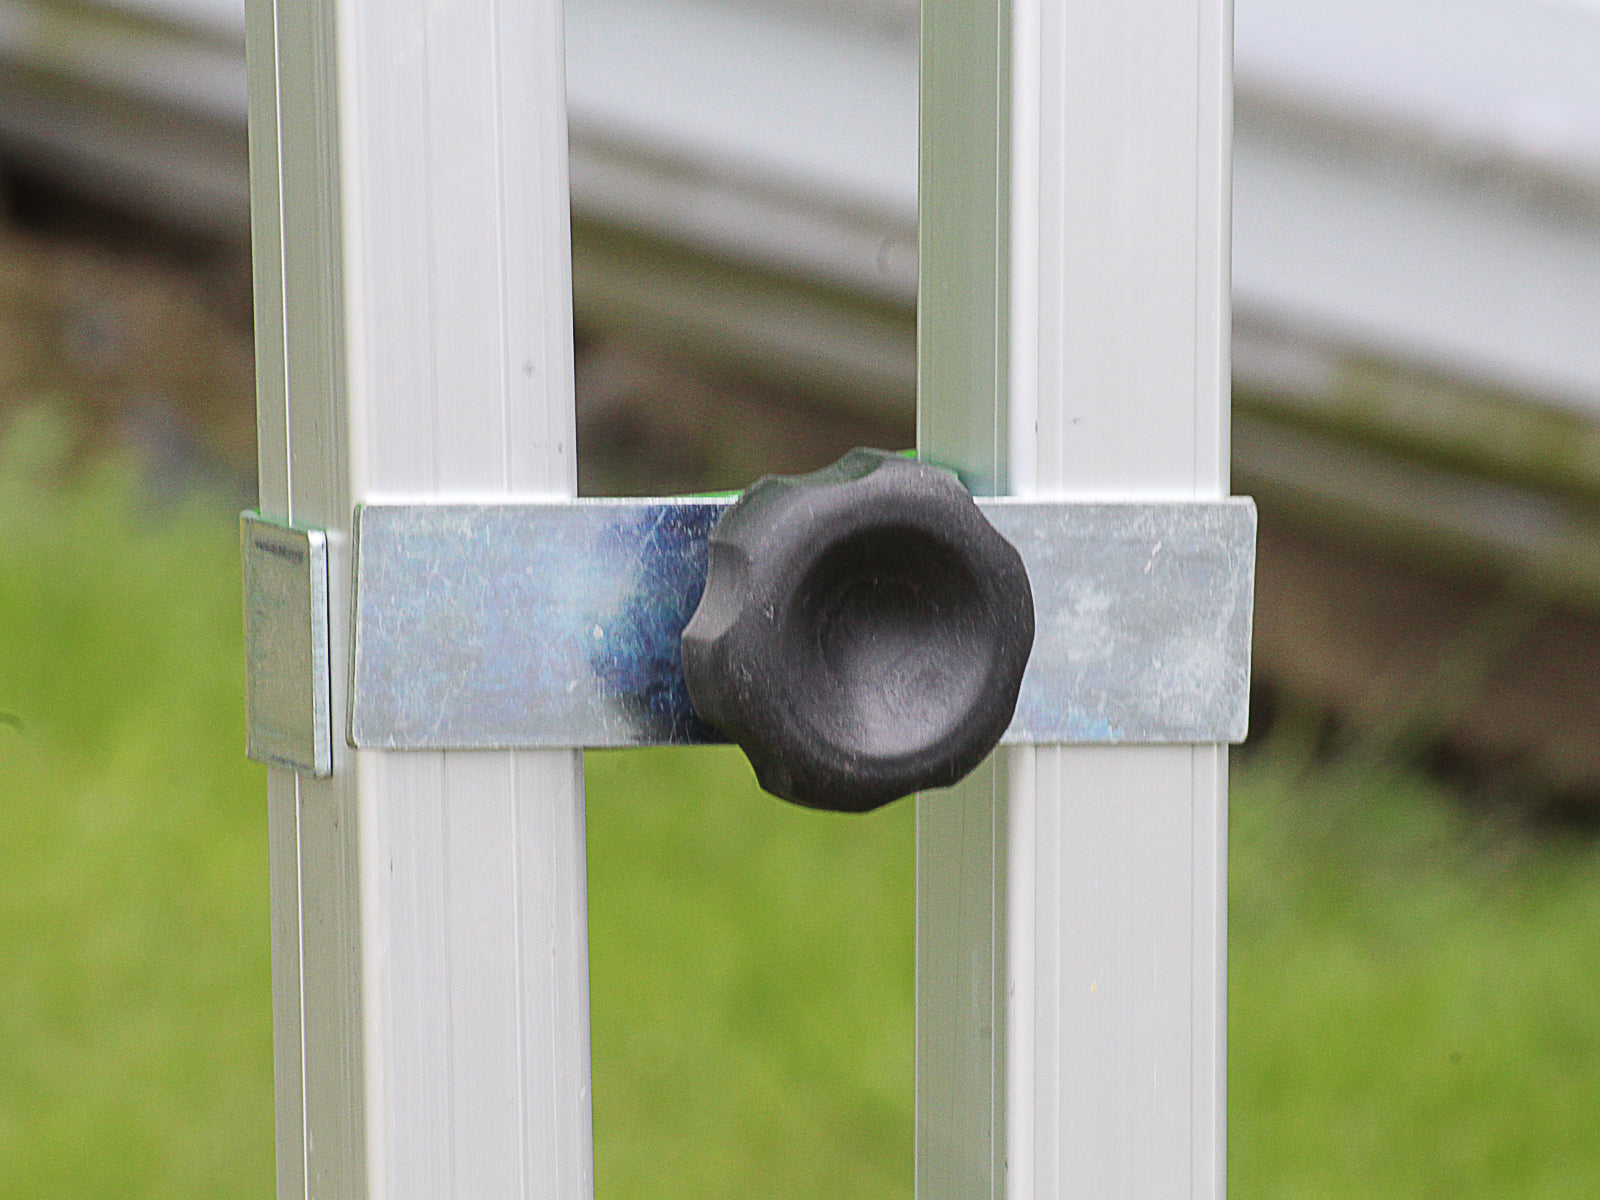
4. A frame with bolts and nuts or a pulling pin is preferable to a click system.
5. The choice of the materials of which the connecting parts are made has also a big influence on the sturdiness of the tent: pieces of aluminium make sure the tent is stronger than a tent with connectors of plastic or PVC.
Our Flexxum folding tents have the best possible quality in the world! That’s also why we don’t give 2 years, but 5 years of warranty!
 |
The PVC protection on top of the poles and connectors prevents damage while using, setting up or transporting the tent. |
 |
The masts have a plastic protection cap and the roof has a double protection and a rope to attach it to the frame. Strong mast of 40 x 40 mm aluminium. |
 |
Connectors without sharp corners to prevent damage. |
 |
An adjustable belt clip to tension the roof optimally. We don't use velcro lashes that will tear after a while. |
 |
Thanks to the rings at each corner of the roof, the tent can easily be anchored using storm belts. |
 |
Our corner poles and masts measure 40 x 40 mm and have a 2.5 mm wall thickness. |
 |
The extendable poles have a pull button and a heavy ring. A pull button is more durable than a press button. The ring is casted in plastic and can thus not be pulled through. |
 |
An extra plastic piece makes sure the leg extends smoothly. The aluminium parts do not touch each other, so that the legs slide in and out without any sound or damage. |
 |
All connectors are crafted in aluminium. We don't use PVC or glass fiber parts that are less inflexible or that breaks more easily. |
 |
All screws, bolts and nuts are made of rust-free nickel-clad steel. |
 |
Nickel-clad steel foot plates, with holes for anchoring with pegs. |
 |
Cross bars in anodized aluminium with 2.5 mm wall thickness. |
 |
All visible parts, like velcro and zippers, are in the same color as the roof. |
 |
The inside roof corners have a very strong double PVC protection (650 g/m²) where the roof touches the frame. |
 |
The roof has a 5 cm wide strong velcro strip to attach the optional side walls and rain gutters. The side walls are fixed to the tent over the entire height of the poles with a 5 cm wide velcro strip, not with velcro lashes that will tear when used intensively. |
PVC light has a long life span and is very easy to clean. It is a woven cloth that is PVC-coated on both sides and therefore looks shiny and solid. PVC light is not printable and is heavier than polyester. If your folding tent is set up outside during a longer period and has to deal with more extreme weather conditions, PVC light is the better option.
Polyester with PVC-coating looks like woven cloth and is completely waterproof thanks to a thin plastic layer on the inside. Printed roofs and side walls are always made of polyester. Roofs and sidewalls of polyester are the most sold ones. These side walls are, just like the ones of PVC, fully waterproof and UV resistant.
An aluminium frame has a wall thickness of 2.5 mm and is quadrangular. These aspects make sure the aluminium frame is much stronger than the steel frame, which has a wall thickness of only 1 mm and is hexagonal.
If you use the tent frequently and often, an aluminium frame is the best option. We only recommend steel frames for inside and rare use (like on trade fairs, events ...).
The standard colors for our standard sizes of folding tents (3 x 3, 3 x 4.5, 3 x 6, 4 x 4 and 4 x 8) with polyester roofs are white, black, sand, red, burgundy, green, dark blue, cream and light gray.
The standard colors for not-standard sizes (2.5 x 2.5, 2.5 x 5, 4 x 6) with polyester roofs are white, black and sand. All other colors are not standard and are a little more expensive, since the have to be produced on demand.
Standard colors for tents of all sizes with PVC light roofs are white and sand.
When purchasing a folding tent, it includes the frame and the roof. Side walls, anchoring, storage bags and other accessories are not included. If you buy a folding tent with a steel frame, a protection cover is included in the price.
To clean your party tent, you can use a simple soap suds. You can also clean the dirtiest spots with a high pressure cleaner, but make sure you keep a safe distance. We recommend you to test the chosen cleaning technique or the product on a less visible spot of the tent in order to see if it doesn't cause damage to your tent.
It is very important that your party tent is completely dry when folding it up and putting it away. Moisture can cause mould on your tent. We also recommend you to transport your folding tent vertically instead of horizontally, if possible.
If a storm is approaching, we recommend you to not leave your tent outside. Our tents can withstand wind - you don't have to put your tent away with a little bit of wind, but in case of a storm, we recommend you to put your folding tent away.
Also with heavy snowfall, we recommend you to not leave the tent outside. If there is no other option, than at least make sure the tent is made snow free regularly.
Partyspace offers different accessories for anchoring your tent optimally:
1. weights
2. heavy pegs with ratchets or storm belts
3. small peg sets for anchoring the corner poles and side walls
From personal experience we also recommend you to provide your tent with a peg or weight at least on the four corners. The 3 x 6 and 4 x 8 folding tents are also safer when fixed in the middle.
For a folding tent of 2.5 x 2.5 or 3 x 3 m we recommend weights of 15 kg per pole. For bigger tents, 30 kg per pole is recommended. Also provide your tent with additional anchoring with gusts of wind of 60 km/h or more.
Moreover, a party tent with all side walls installed is safer than a party tent without side walls.
We also offer specific storm sets, that exist of small pegs for the side walls, ratchets and pegs.
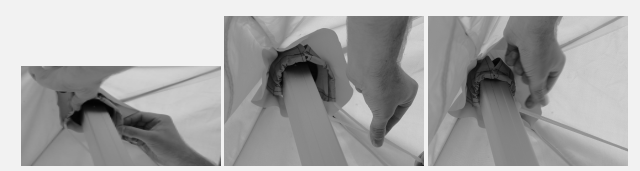
1. Take the frame in the middle and walk backwards. Do not open the frame completely to install the roof.
2. Install the roof in such a way that the corners of the roof and the corners of the frame correspond.

3. Each corner of the roof has two velcro lashes on the inside. Put these around the corner pole tightly. Make sure the PVC protection in the corner is not folded behind the pole.

4. Attach the peak of the roof to the mast with the pole cap. (Step 4 is not applicable for printed roofs - these do not need to be fixed to the mast.).
Pitching the folding tent
1. Take the cross bars of the frame with both hands at the bottom and walk backwards.
2. Pull the tent open.
3. Put your foot on the foot plate.
4. Take the frame with both hands and push it up until it clicks. Repeat this step with every tent pole.
5. Put the end of the click system in the middle of each side of the tent through the square hole of the frame. Click it together.
6. Pull the roof a bit down with one hand and tighten the ribbon with the other.
7. Pull the rings at the bottom of the tent poles and lift the tent. The bottom part of the tent leg should slide out of the upper part. If it doesn't, pull down the bottom part of the tent pole while pulling the ring.
8. Let the rings go and lift the upper part of the tent until it clicks. First do this on one side of the tent, then on the other side. Never do this diagonally.
Attaching the side walls
1. Turn the flaps around one pole and attach the side wall downwards with the velcro strap.
2. Attach the horizontal velcro strap on the side wall to the roof of the tent, starting where the side wall is already attached to the pole.
3. Turn the other flaps around the other pole and attach downwards with the velcro strap.
4. There is a cut-away for the click system of the poles. If you did this correctly, the side wall is tightly installed.
5. To install the next side wall, start at the outside of the already installed one.
6. Stick the velcro on the back of the already installed side wall and start over with step 2. Repeat this until all desired side walls are installed.
Anchoring the folding tent
1. The tent roof has an eye at each corner of the tent to which you can attach straps. Make sure the straps are thoroughly tightened.
2. You can fix the side walls by means of small pegs in the holes at the bottom of each side wall. There are also holes in the foot plates of the tent frame in order to install small pegs. You can also place weights on the foot plates.
Check all anchoring options for the Partyspace folding tents.
Folding the tent together
1. Pull the rings at one side of the tent (not diagonally) in order to let the tent down. Then repeat this on the other side until all poles are at ground level.
2. Loosen the ribbons and release the click systems at the sides of the tent.
3. Put your foot on the footplate of the tent pole, push the roof structure a bit upwards and pull the rings in the upper part of the frame. Let the frame down.
4. Push the frame (at the top of the tent in the middle of the side) with two persons each at a short side of the tent towards the middle of the tent.

Folding tents can widthwise or lengthwise be coupled with one another, forming a big or long tent. To do so, we have different accessories in our product range: rain gutters, connectors, velcro connectors.
Rain gutter
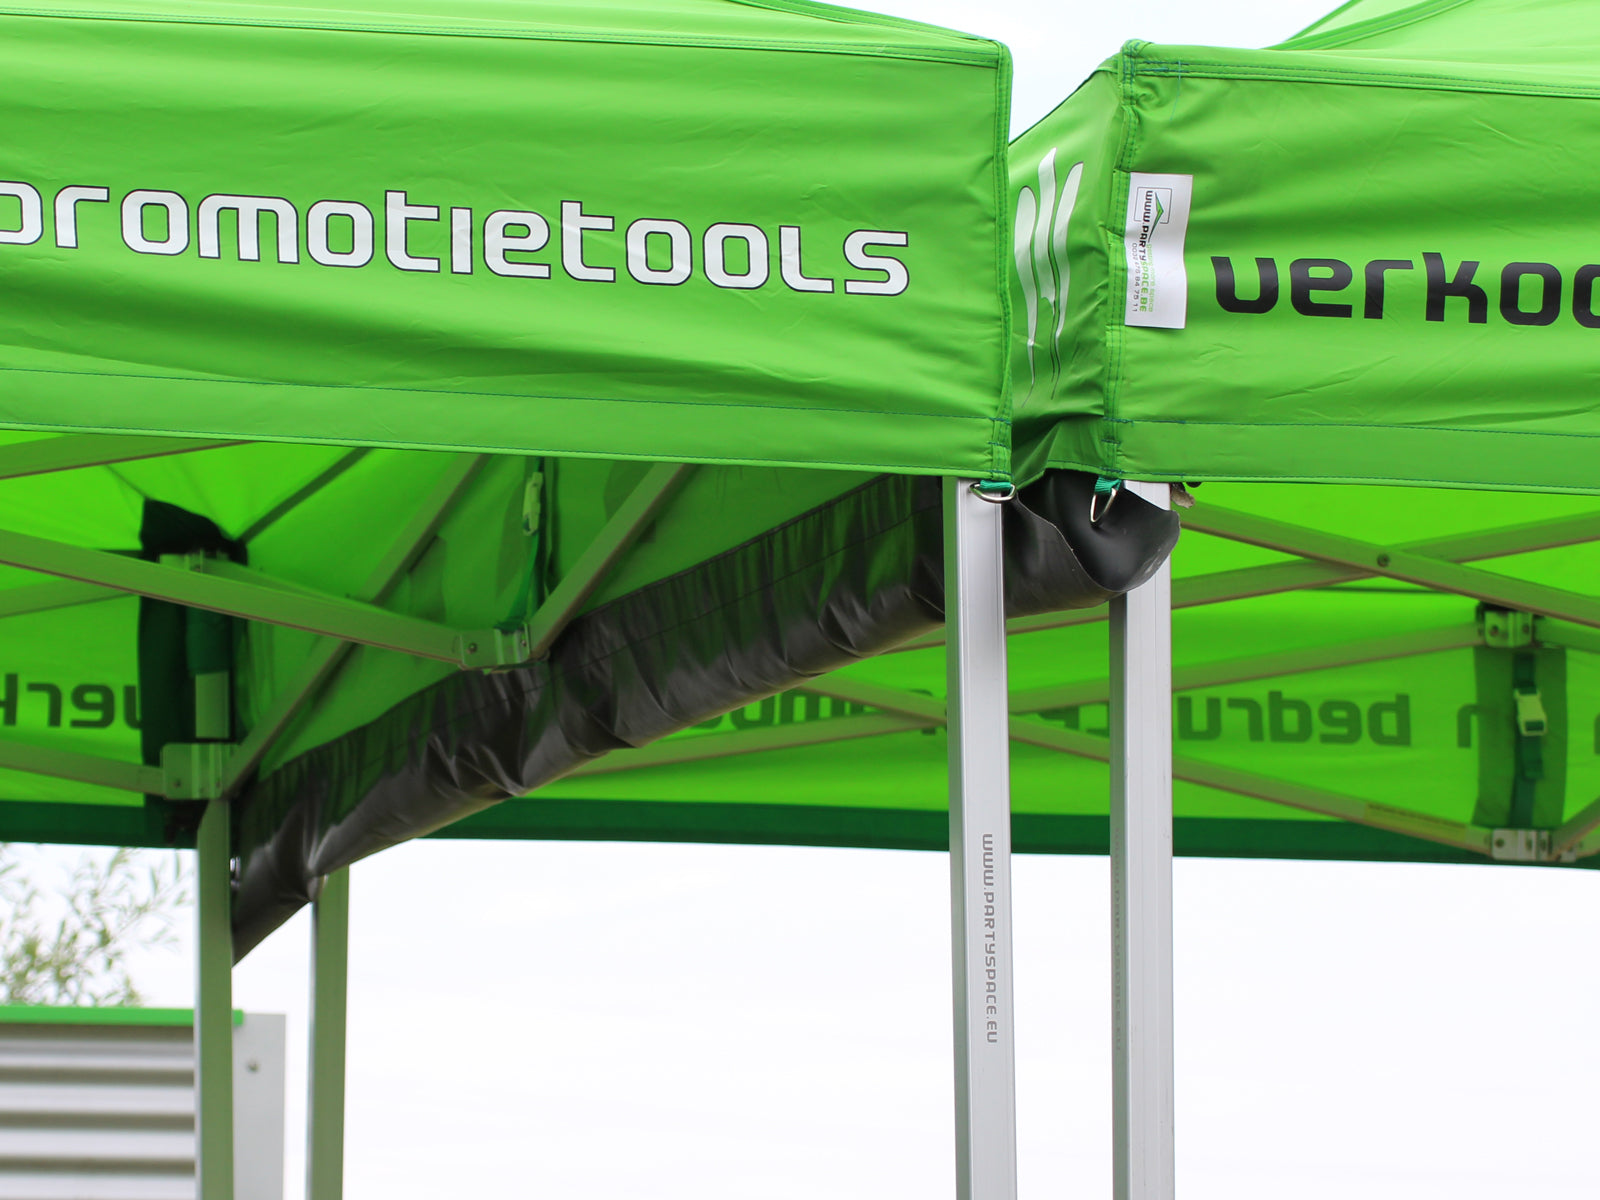
Vertical connection for folding tents
Coupled tents with rain gutter, vertical connection and velcro connection
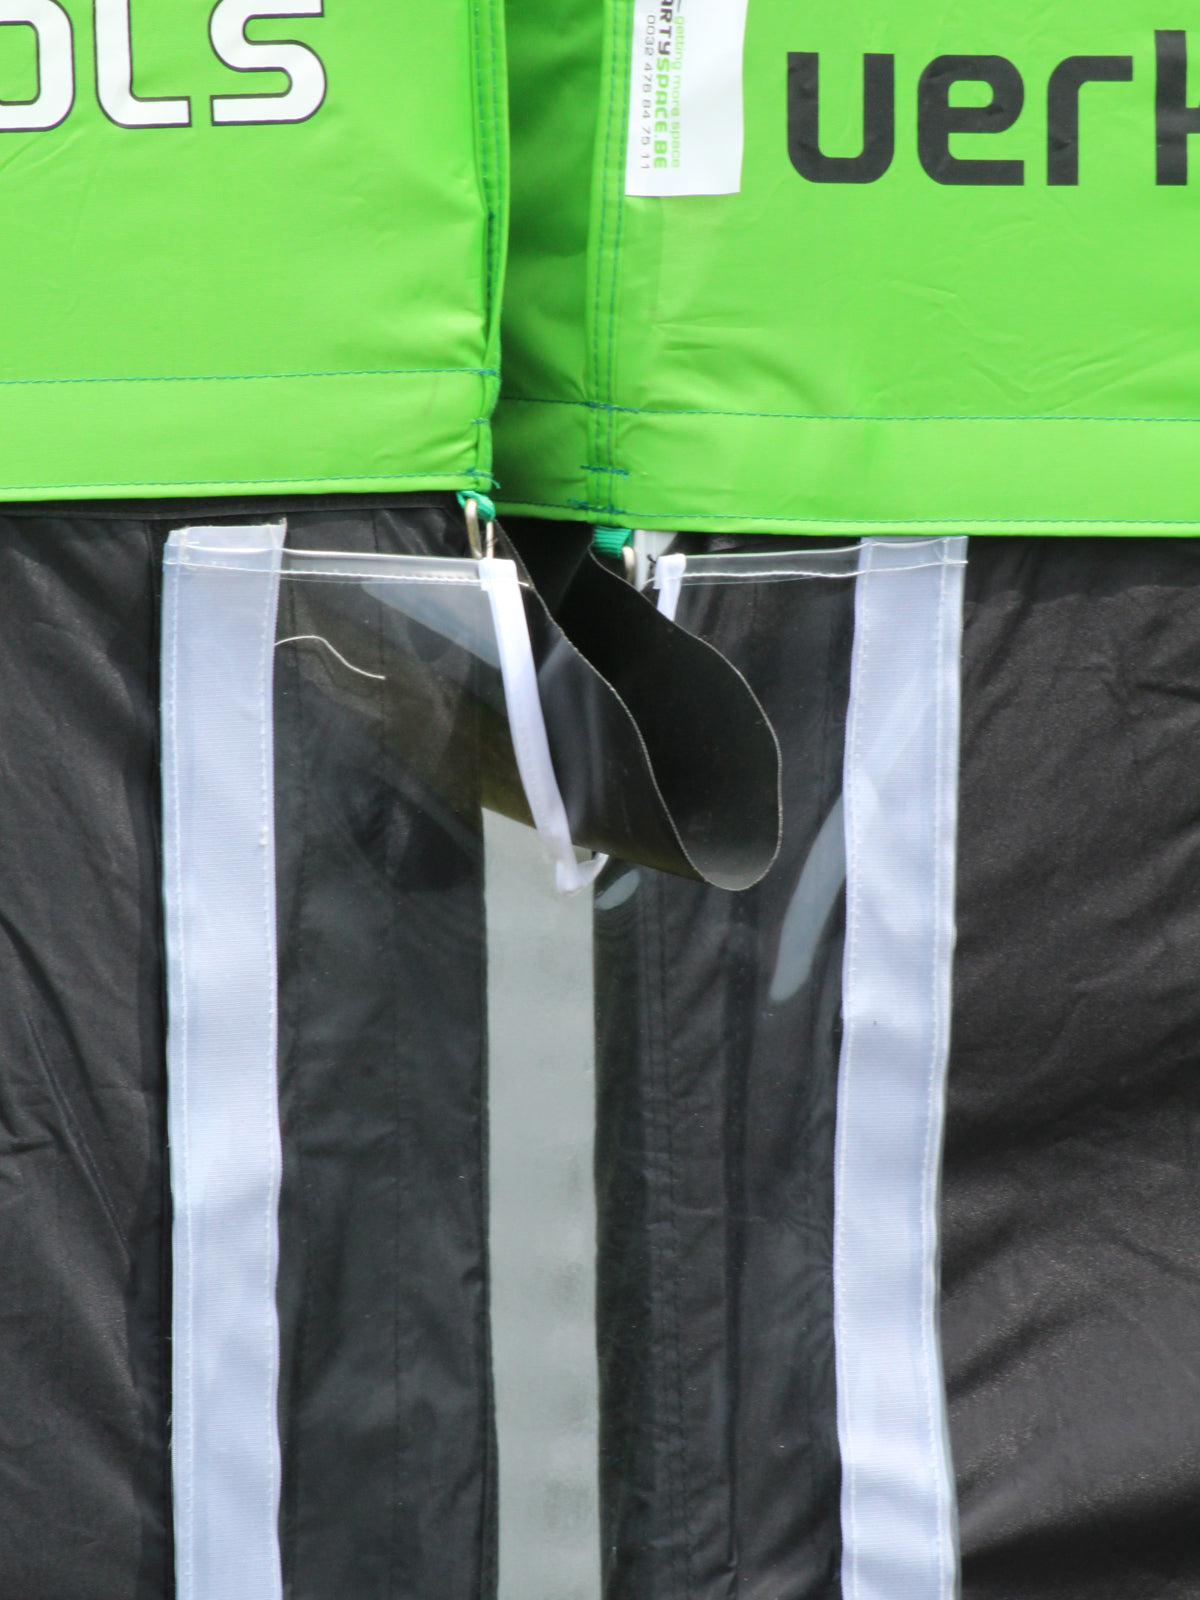
If the roof and the side walls are installed in a correct way, the tent is completely waterproof. Because the side walls are fixed across the entire width of the roof with velcro, water can not enter in between the roof and the side walls.
The sidewalls are also fixed across the entire height of the tent with velcro, which assures a waterproof tent, also on the sides and the corners.
Every part of the folding tent is available separately. You can just replace the broken part and your folding tent is brand new again!
The side walls for folding tents of 2.5 x 2.5 m, 2.5 x 5 m, 3 x 3 m, 3 x 4.5 m and 3 x 6 m are 2.06 m in height. If the tent is set up on the second height, the side walls just touch the floor.
The side walls for folding tents of 4 x 4 m, 4 x 6 m and 4 x 8 m are 2.15 m in height. If the tent is set up on the second height, the side walls just touch the floor.
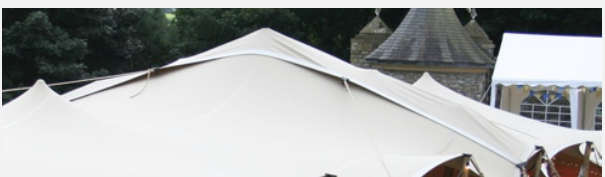
The roof and side walls of the Partyspace pagoda tent are made of 820 g/m² PVC. This material has a very long life span and is very easy to clean. It is woven cloth that has a PVC coating on both side, which makes it look shiny and solid.
With non-keder pagoda tents, the side walls are installed using velcro straps. With pagoda tents with keder, the side walls are slid into the keder grooves in the tubes of the pagoda tent frame. This makes sure the tent is completely water- and windproof. Partyspace only sells pagoda tents with keder.
The flag that is installed on top of the pagoda tent is often put inside one of the tubes. If you do not immediately find the flag, check all the tubes. In most cases, the flag will appear.
For the 3 x 3 m, 4 x 4 m and 5 x 5 m pagoda tents, construction books are available. For the 6 x 6 m pagoda tent, there is no construction book available. The construction books are personalized for the client with a watermark.
The longest box of a pagoda tent of 3 x 3 m is 288 cm in length.
The longest box of a pagoda tent of 4 x 4 m and 5 x 5 m is 248 cm in length.
The longest box of a pagoda tent of 6 x 6 m is 290 cm in length.
Depending on the size of the tent, other building times are applicable. The times stated below can of course differ. People who are used to building pagoda tents will spend less time on building one than people who build one for the first time.
Generally, the following building times are applicable:
3 x 3 - 45 minutes
4 x 4 - 60 minutes
5 x 5 - 75 minutes
6 x 6 - 90 minutes
You can build up a pagoda tent with two persons, but of course, many hands make light work. A third pair of hands would be no luxury.
There are different ways of cleaning your pagoda tent:
1. with a soft green soap or dishwashing detergent, tepid water and a soft sponge.
2. with a high pressure cleaner. Always keep a safe distance of 30 cm between the cloth and the cleaner!
Never use acetone, thinner or any other solvent!
You can repair small tears or holes yourself using Tear Aid type A.
On demand you can also obtain repair kits, that exist of a piece of cloth with the same color and specifications as the cloth of the tent, and glue, to stick the piece of cloth on the damaged part of the tent.
If the damage is too big to repair using Tear Aid or a reparation kit, we can send the tent to production, where a new piece of cloth will be welded over the tear or hole.
There are different ways of cleaning your stretch tent:
1. with a soft green soap or dishwashing detergent, tepid water and a soft sponge.
2. with double coated stretch tents, you can use a high pressure cleaner. Always keep a safe distance of 30 cm between the cloth and the cleaner!
Never use acetone, thinner or any other solvent!
You can build smaller stretch tents (6.5 x 5 m, 6.5 x 6.5 m, 6.5 x 10 m) with two persons. For the bigger sizes (8.5 x 10 m, 10 x 10 m, 10 x 12 m, 10 x 15 m, 10 x 20 m) you will need some extra pairs of hands. To build big stretch tents, it would be no luxury to work together with 5 persons.
Of course, the more you build up stretch tents, the more you get used to it and the faster it will go.
To build up the small stretch tents (6.5 x 5 m, 6.5 x 6.5 m, 6.5 x 10 m) you will need between 45 and 60 minutes. For the bigger sizes (8.5 x 10 m, 10 x 10 m, 10 x 12 m, 10 x 15 m, 10 x 20 m) it is better to take 90 minutes to two hours in order to build it up.
Of course, as always: the more you build up stretch tents, the better you get used to it and the easier it becomes.
You can download a manual about preparing and installing your wooden poles for your stretch tent.
If the poles of your stretch tent fall down, this can have multiple reasons.
1. The tent cloth is not tensioned enough. Tighten the straps a bit more or tilt the side poles of your tent a bit more, so that the cloth is more drawn to the ground, which makes sure the cloth is properly tensioned.
2. The used poles are too short. Use longer poles, certainly in the middle of the tent.
3. The poles of different lengths are too close to one another. Put the poles further apart. For example, if you put a pole of 350 cm close to one of 400 cm, the pressure on the one of 350 cm is not high enough, which increases the chance of the pole falling down.The wind is lifting up the cloth.
4. With stronger wind, it is possible that the wind lifts up the stretch tent cloth, which decreases the pressure of the cloth on the poles and results in poles falling down. You can solve this problem by installing astorm belt(also available as astorm set) over the tent. With bigger stretch tent sizes and connected stretch tents, you will need multiple storm belts.
If you want to connect two stretch tents with a connection strip, you have to take into account that a big stretch cloth is able to stretch more than a thin connection strip of more or less one meter in width. It may seem that the tent and the connection strip are not equally long, but in fact they really are.
A connection strip, just like a stretch tent cloth itself, is fixed using corner clamps. Depending on the size of the connected tents and the length of the connection strip, it is possible that the strip is blown upwards by the wind. You can solve this easily by attaching side clamps to the side of the connection strip and thus by anchoring the connection strip at the sides as well.
The hardware set for all of our star tents are the same, regardless of the diameter of the star tent. To build up a star tent with 10 m diameter, you leave out one pole (pole 3 or 4 - from left to right). To build up a star tent of 12, 14 or 16 m diameter, you need all the poles.
Pole number 2 (from left to right) of the hardware set consists of two parts. Sometimes it is possible that the two parts are in the hardware set separately. These should be slid into one another in order to set up the star tent.
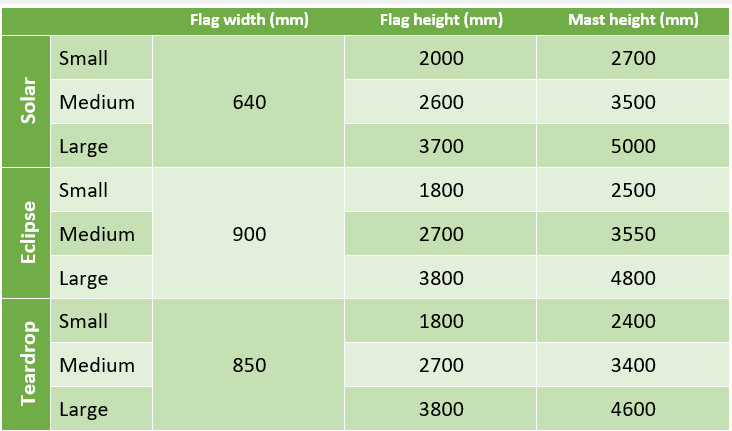
Below you can find an overview of the different flags:
Our flags are meant for promotional purposes and for making stand out your company or event.
It is not recommended to leave these flags outside at all times. We recommend you to take them inside with a heavy wind or storm.
A foldable cube is very solid. An average adult can stand on it. The maximum weight that can rest on a printed foldable cube is about 85 kg.
A pouf can also be used as a chair by an average adult and can thus also support about 85 kg. The inside of the pouf is mousse, which makes a pouf a little less strong than a foldable cube or a chair.
A Benchi chair is the strongest and can hold up to 250 kg.